Coconut Mango Thai Rice Pudding

vertical

wood-hor

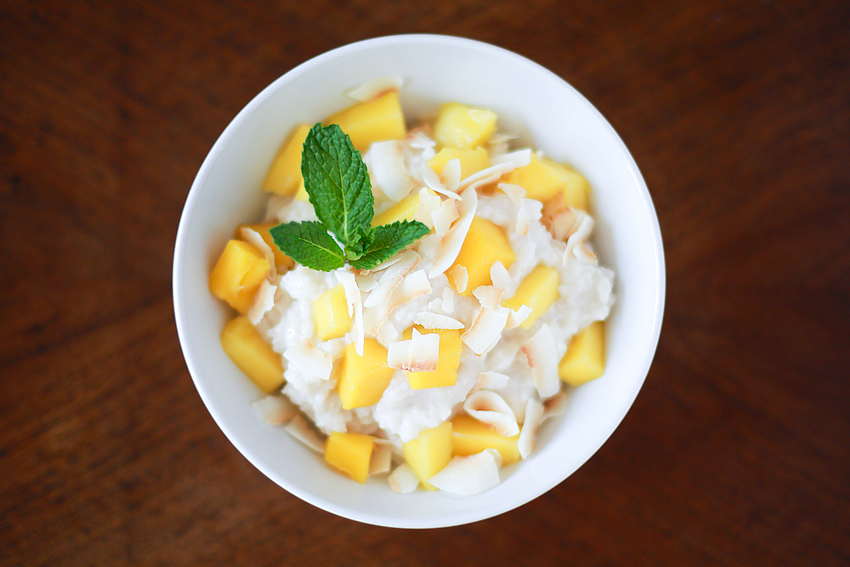
I’ve been daydreaming of the sun bronzing my skin while laying on a warm bed of sand. The ocean in Oregon is too cold to dip my toes into, so I decided to whip something up in the kitchen to transport me to a tropical island far far away. For those of you who live in areas of the world that haven’t been able to catch a break from the snow, make this recipe! It will take you to a place of cabanas and bikinis, even if only for a little while. This recipe takes 20 minutes to make and is a healthy version of traditional rice pudding. When I ate this, I am not kidding when I tell you it tasted like paradise! It has just a hint of sweetness from honey and the creamy, nuttiness of the coconut milk is perfection. The fresh mango and toasted coconut on top sends your tastebuds to Thailand. This recipe is dairy-free, gluten-free and does not use cane sugar, so you can feel good about yourself after eating a big bowl of it. Plus, kids will love this all natural sweet treat and won’t even realize it’s healthy for them. You’re welcome!

Recipe : Coconut Mango Thai Rice Pudding

1 cup Thai Jasmine Rice (you could also use arborio rice)
4 cups Coconut Milk
2 1/2 cups Water
1/4 tsp Sea Salt
1/4 cup + 1 tbsp Honey
1 tsp Vanilla Extract
1 Mango
1 cup Unsweetened Toasted Coconut Flakes

Place rice, coconut milk, water and salt into a medium sauce pan and bring to a boil. Turn temperature down to a simmer and stir continuously for 20 minutes with a wooden spoon. (If you find the mixture to be too thick for your liking, add an extra 1/2 -1 cup of water for a thinner consistency.) Once it has thickened, take off of burner and stir in your honey and vanilla extract. Transfer to a bowl and let it cool to room temperature before placing in the refrigerator for at least a couple of hours to chill and set. When it is ready to eat, top with diced mangos and unsweetened, toasted coconut flakes. If you want to be extra fancy, garnish with a sprig of mint.


Strawberry + Whipped Ricotta Crostini

strawberry-toast-vertical

Strawberries are now in season and I came up with a simple crostini recipe that I’m certain will to be a huge hit at your next brunch or dinner party! They are the perfect 3 bite snack that will satisfy that sweet and savory craving.

Ingredients:

Whole Milk Ricotta Cheese
Soft Goat Cheese
Lemon
Strawberries
Honey
Salt + Pepper
Raw Pistachios
French Baguette

Whipped Ricotta + Goat Cheese Spread

* 1 cup Whole Milk Ricotta Cheese
* 1/4 + 1/8 cup Softened Goat Cheese
* 1 tsp Lemon Zest
* 1 1/2 tsp Lemon Juice
* Pinch Salt

Slice Baguette into 1/2″ pieces. Drizzle with evoo and broil for 2 minutes until lightly golden. Whip together the cheese spread and place a spoonful onto each crostini. Place thinly sliced strawberries on top and drizzle with honey. Garnish with cracked black pepper and chopped pistachios. Enjoy!

Hello Spring! Painted Tulip Cookies

I am always inspired by nature and when signs of spring start to appear, my eyes nearly pop out of my head every time I walk by a new flower in bloom. I decided to welcome in this beautiful season by decorating shortbread cookies with hand painted watercolor tulips. I hope you enjoy this little video tutorial.
Here’s what you’ll need to get started!
Royal Icing Recipe
* 1 lb 10x Sugar (powdered sugar)
* 3 tbsp Meringue Powder
* 1 tbsp Vanilla Extract
* 1/4 – 1/2 cups Warm Water (add enough water until you have a ‘flooding’ consistency)
Place dry ingredients into a mixer fitted with a paddle attachment. Add vanilla extract. Turn mixer on low speed and slowly pour in 1/4 cup of water. Turn speed on high until icing turns bright white and becomes fluffy (a few minutes). If icing is too stiff for a flood, mix in the extra water a little at a time until it reaches the proper consistency. Place royal icing into a piping bag fitted with a coupler and a #3 piping tip. To learn the painting technique for decorating the cookies, watch the video tutorial!
1 6 7 8 9 10 11 12 21